Netflix的Hystrix(豪猪)通过对调用的服务进行资源隔离,实现熔断降级的功能,提升分布式系统的可用性和稳定性。因此我们主要关注其是如何实现资源隔离和熔断限流。
Hystrix执行流程
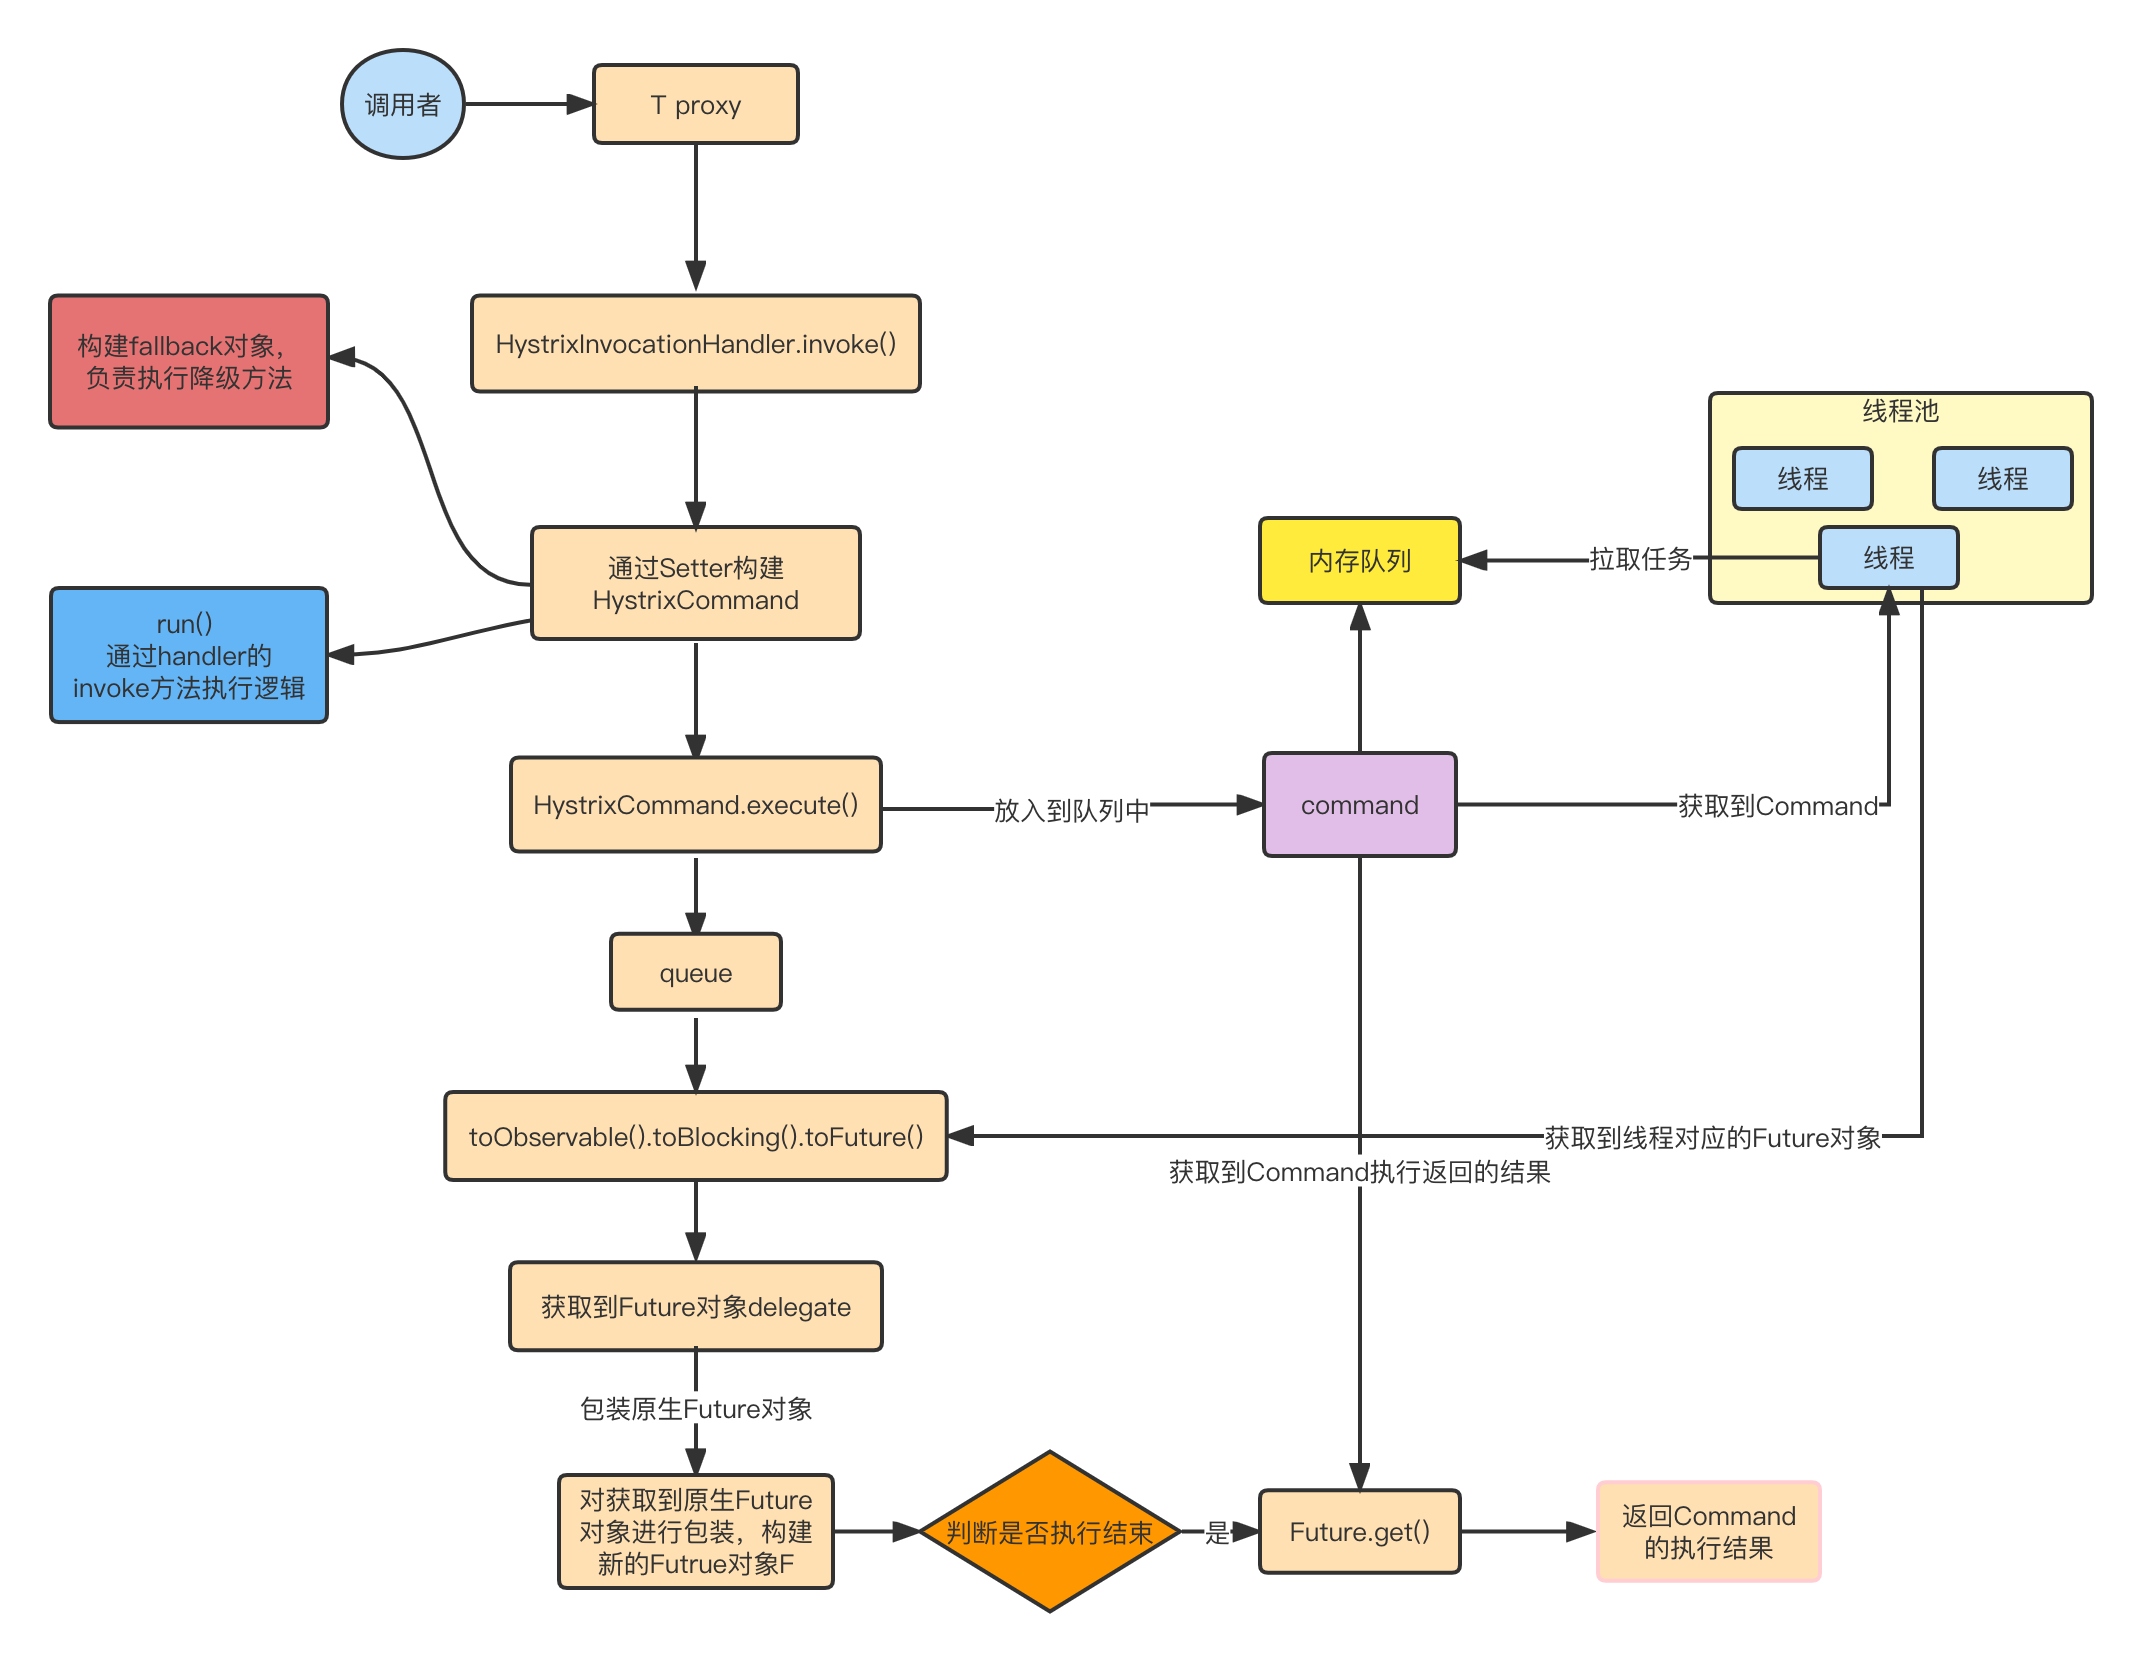
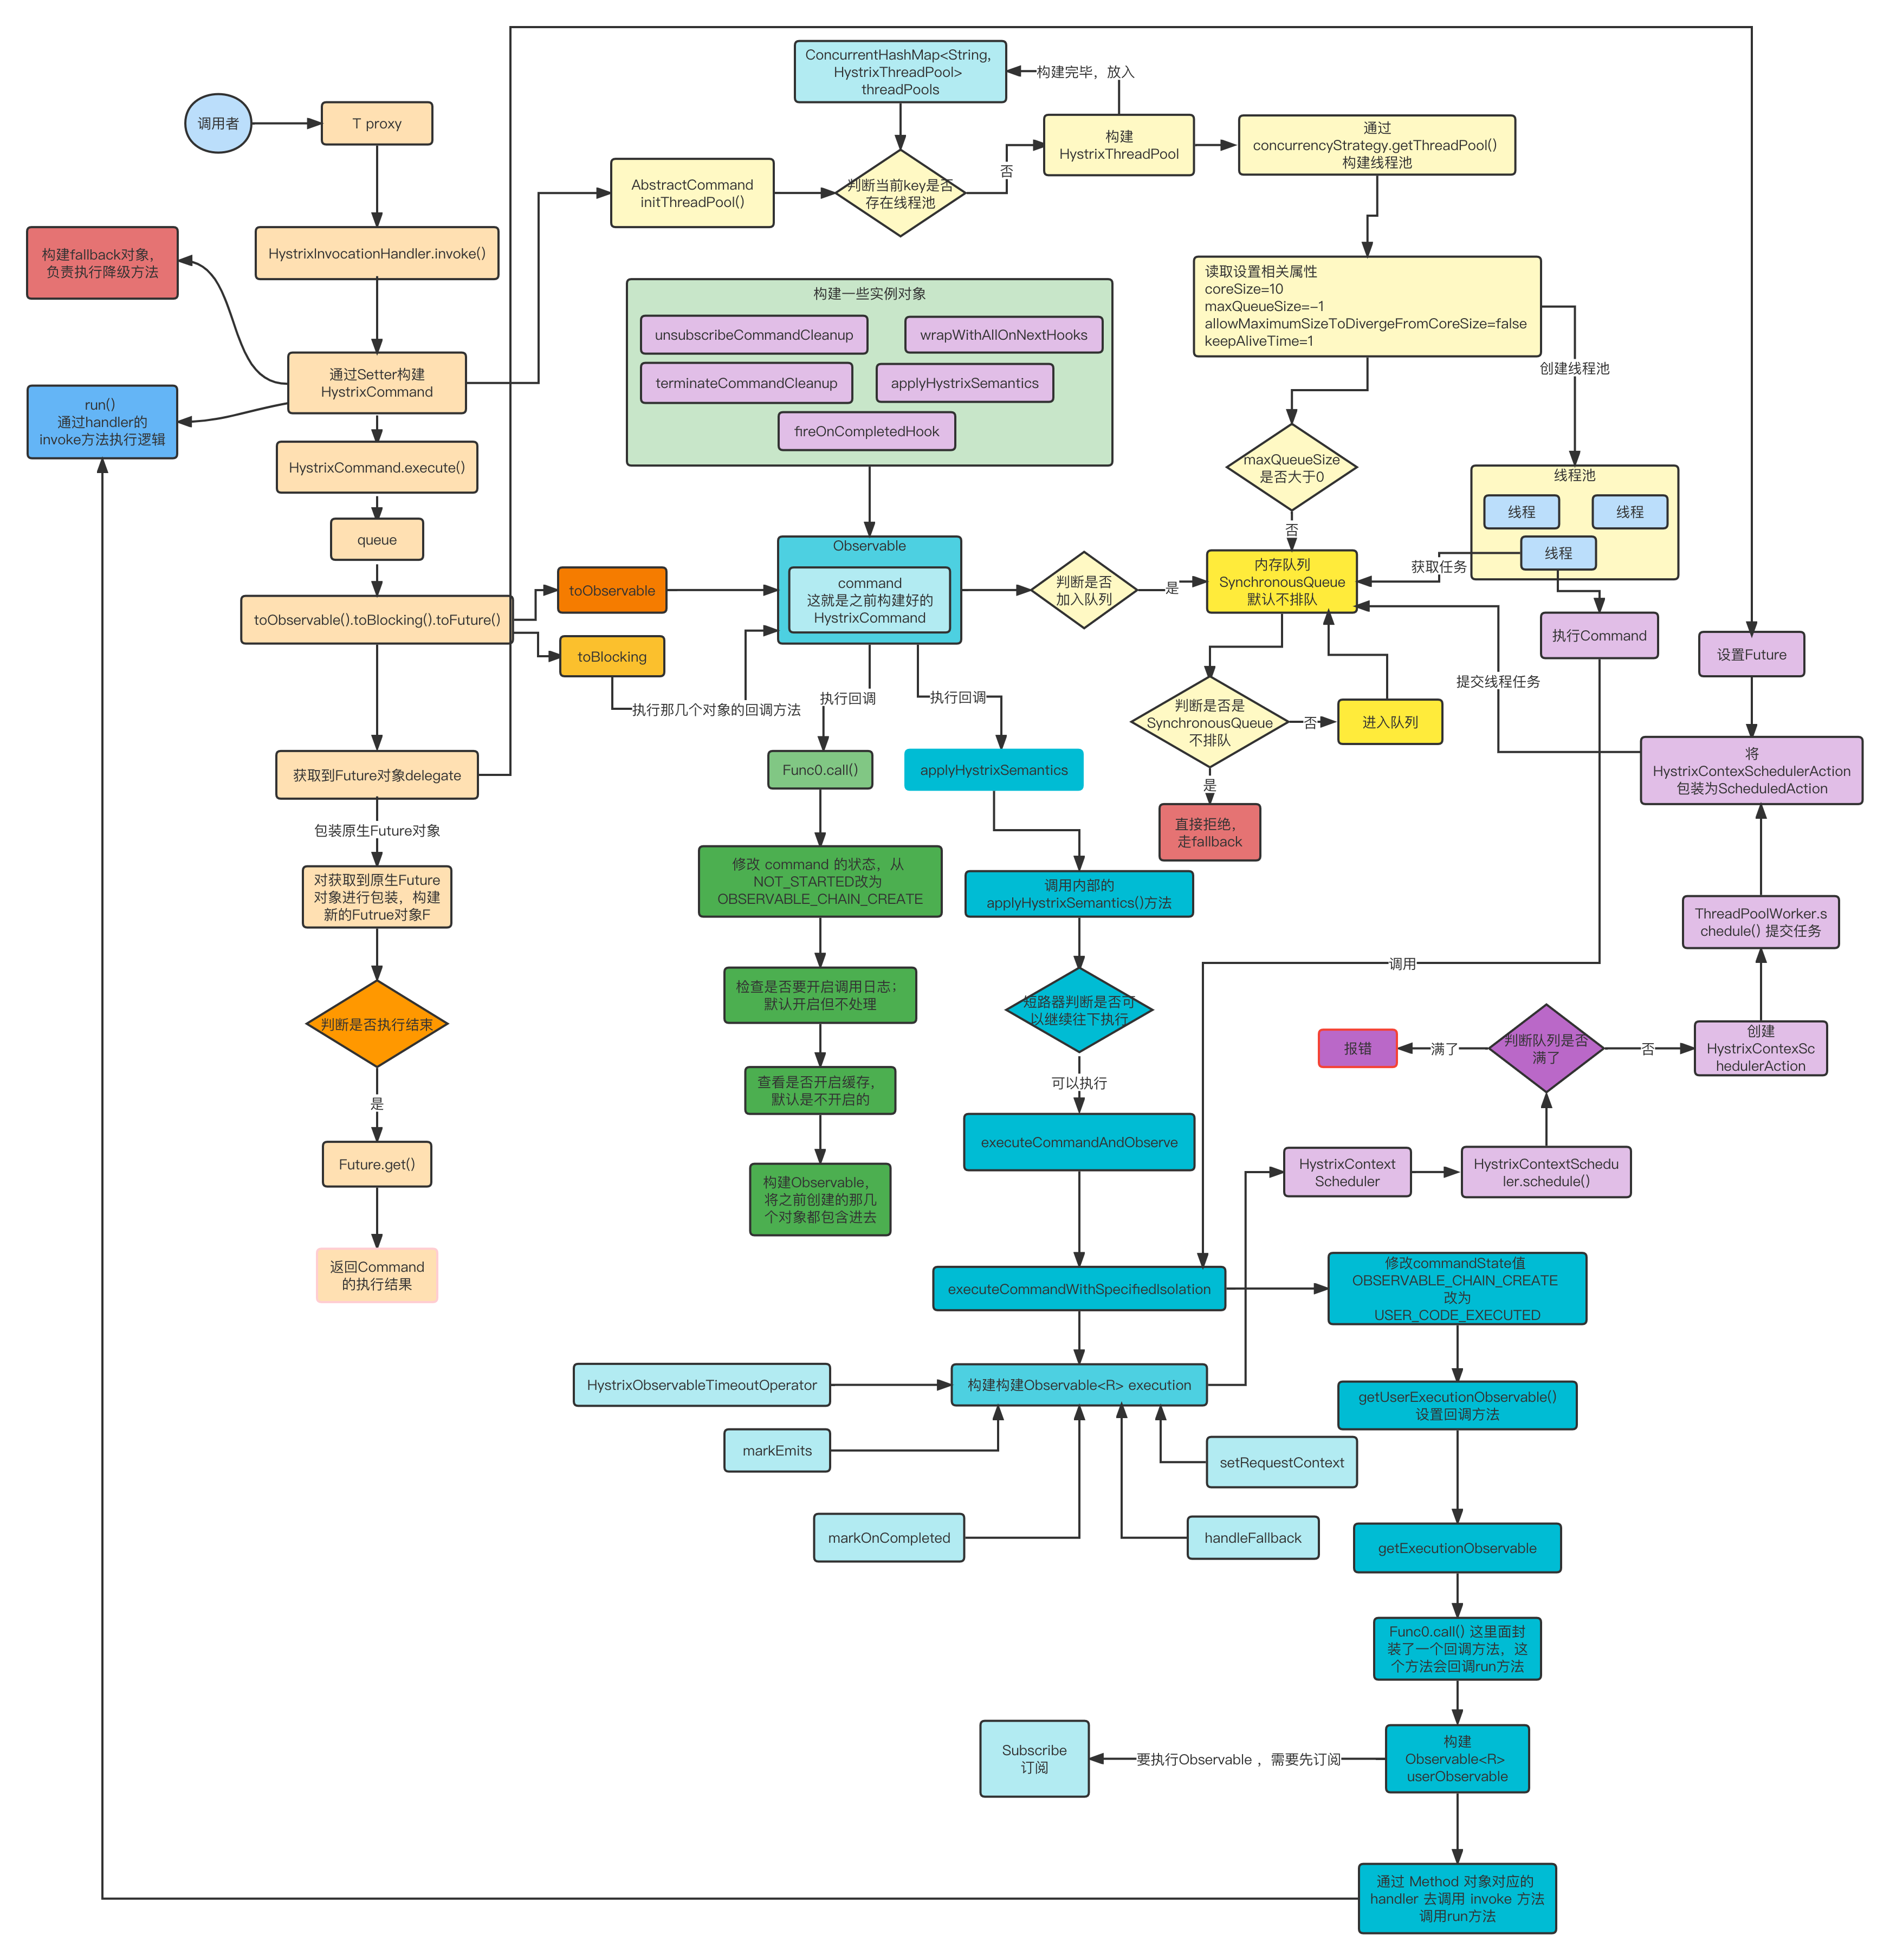
下面流程图为Hystrix执行的大致流程图
1.创建Command
共有2中类型的Command:HystrixCommand(返回一条数据)和HystrixObservableCommand(返回多条数据)
HystrixCommand<Train> command = new HystrixCommand<Train>(HystrixCommandGroupKey.Factory.asKey("group_name")) {
    @Override
    protected Train run() throws Exception {
        return trainFeignClient.findTrain();
    }
};
这里可以设置参数可以通过 HystrixCommandProperties.Setter() 做更多设置;
HystrixCommand<Train> command = new HystrixCommand<Train>(HystrixCommand.Setter
        // 设置线程组名称
        .withGroupKey(HystrixCommandGroupKey.Factory.asKey("group_name"))
        .andCommandPropertiesDefaults(HystrixCommandProperties.Setter()
        // 设置隔离方式
        .withExecutionIsolationStrategy(HystrixCommandProperties.ExecutionIsolationStrategy.THREAD))
        ) {
            @Override
            protected Train run() throws Exception {
                return trainFeignClient.findTrain();
            }
};HystrixObservableCommand<Train> command = new HystrixObservableCommand<Train>(HystrixCommandGroupKey.Factory.asKey("group_batch")) {
@Override
protected Observable<Train> construct() {
return Observable.unsafeCreate((Observable.OnSubscribe<Train>) subscriber -> {
try {
if (!subscriber.isUnsubscribed()) {
subscriber.onNext(trainFeignClient.findTrain());
subscriber.onNext(trainFeignClient.findTrain());
subscriber.onCompleted();
}
} catch (Exception e) {
subscriber.onError(e);
}
}).subscribeOn(Schedulers.io());
}
});2.调用Command的执行方法
执行Command共计有如下4种方式:
- execute():调用后直接阻塞等待结果返回,属于同步调用;
- queue():返回一个Future,属于异步调用,后面可以通过Future获取单条结果
- observe():订阅一个Observable对象,Observable代表返回的结果
- toObservable():返回一个Observable对象,如果我们订阅这个对象,就会执行command并且获取返回结果
其中execute()和queue()仅仅对HystrixCommand适用。
K             value   = command.execute();
Future<K>     fValue  = command.queue();
Observable<K> ohValue = command.observe();
Observable<K> ocValue = command.toObservable();
execute()实际上会调用queue().get().queue(),接着会调用toObservable().toBlocking().toFuture()
也就是说,无论是哪种执行command的方式,最终都是依赖toObservable()去执行的
调用HystrixObservableCommand.construct()或HystrixCommand.run()来实际执行这个command;
如果HystrixCommand.run()或HystrixObservableCommand.construct()的执行,超过了timeout时长的话,那么command所在的线程就会抛出一个TimeoutException; 如果超时会去执行fallback降级机制,而且不会管run()或construct()返回的值;
注意:我们是不可能终止掉一个调用严重延迟的依赖服务的线程的,只能抛出来一个TimeoutException,但是还是可能会因为严重延迟的调用线程占满整个线程池。
如果没有超时,那么就会拿到返回的结果,之后hystrix会做一些logging记录和metric统计
查找是否开启了 request cache ,是否有请求缓存,如果有缓存,就直接读取
基本组件
1、Request Cache
首先会有一个 request context 的概念,每一个请求都会在 filter 里面,对每一个请求施加一个请求上下文,在一次请求上下文中,如果有多个 Command ,它的参数都是一样的,调用的接口都是一样的,其实它的结果也可以认为是一样的,这个时候,我们就可以让第一次 Command 执行,返回的结果,被缓存在内存中,然后这个请求上下文中,后续的其他对这个依赖的调用全部从内存中取用缓存结果就可以。
HystrixCommand 和 HystrixObservableCommand 都可以指定一个缓存 key ,然后 hystrix 会自动进行缓存,接着同一个 request context 内,再次访问的时候,就会直接取用缓存,避免重复执行网络请求。
对于请求缓存(Request Cache),请求合并(Request Collapsing),请求日志(Request Log)等等都必须 自己管理 HystrixRequestContext 的声明周期
2、fallback 降级机制
hystrix 调用各种接口,或者访问外部依赖,出现了异常情况
对每个外部依赖,只能是用一定量的资源去访问,线程池/信号量,如果资源池满了,会出现 reject
访问外部依赖,如果出现超时,会曝出 TimeOutException
短路器发现异常事件占比达到了一定比例,直接开启短路
以上情况,均会执行 fallback 机制,比如我们可以通过本地 cache ,作为一个存内存的基于 lru 自动清理的缓存,如果发生了上述情况,可以执行尝试从 cache 中获取数据,或者返回一个默认值
3、短路器
- 如果经过短路器的流量到达了一定的阈值
HystrixCommandProperties.circuitBreakerRequestVolumeThreshold(); - 如果短路器统计到的异常调用占比达到了一定的阈值,
HystrixCommandProperties.circuitBreakerErrorThresholdPercentage(); - 短路器从 close 状态转换成 open 状态
短路器打开的时候,所有经过该短路器的请求,全部短路,不调用后端服务,直接走 fallback 机制
经过了一段时间之后 HystrixCommandProperties.circuitBreakerSleepWindowInMilliseconds() ,会让一条请求经过短路器,看能不能正常调用,如果调用成功了,那么就自动恢复,转到 close 状态
Hystrix和Feign参数整合
hystrix:
  command:
    default:
      execution:
        isolation:
          # 隔离模式:线程池隔离
          strategy: THREAD
          thread:
            # 线程超时时间,单位毫秒
            timeoutInMilliseconds: 1000
            # 设置HystrixCommand.run()的执行是否在超时发生时被中断
            interruptOnTimeout: true
        semaphore:
          # 流量阀值
          maxConcurrentRequests: 10
        timeout:
          # 超时是否开启
          enabled: true
      circuitBreaker:
        # 短路器是否开启
        enabled: true
        # 熔断触发最小请求次数
        requestVolumeThreshold: 20
        # 熔断后休眠多久,单位毫秒
        sleepWindowInMilliseconds: 5000
        # 触发熔断错误的比例阀值
        errorThresholdPercentage: 50
1.线程池相关属性配置
hystrix.threadpool.default.coreSize:线程池大小,默认10hystrix.threadpool.default.maximumSize:线程池最大大小,默认10hystrix.threadpool.default.allowMaximumSizeToDivergeFromCoreSize:是否允许动态调整线程数量,默认false,只有设置为true了,上面的maximumSize才有效hystrix.threadpool.default.keepAliveTimeMinutes:默认是1,超出coreSize的线程,空闲1分钟后释放掉hystrix.threadpool.default.maxQueueSize默认-1,不能动态修改hystrix.threadpool.default.queueSizeRejectionThreshold可以动态修改,默认是5,先进入请求队列,然后再由线程池执行
2.Command执行相关参数
hystrix.command.default.execution.isolation.strategy:隔离策略,默认Thread,可以选择Semaphore信号量hystrix.command.default.execution.isolation.thread.timeoutInMilliseconds:超时时间,默认1000mshystrix.command.default.execution.timeout.enabled:是否启用超时,默认turehystrix.command.default.execution.isolation.thread.interruptOnTimeout:超时的时候是否中断执行,默认truehystrix.command.default.execution.isolation.semaphore.maxConcurrentRequests:信号量隔离策略下,允许的最大并发请求数量,默认10
3.降级相关属性
hystrix.command.default.fallback.enabled: 默认true
4.熔断相关属性
hystrix.command.default.circuitBreaker.enabled:是否启用熔断器默认truehystrix.command.default.circuitBreaker.requestVolumeThreshold:10秒钟内,请求数量达到多少才能去尝试触发熔断,默认20hystrix.command.default.circuitBreaker.errorThresholdPercentage:10秒钟内,请求数量达到20,同时异常比例达到50%,就会触发熔断,默认50hystrix.command.default.circuitBreaker.sleepWindowInMilliseconds:触发熔断之后,5s内直接拒绝请求,走降级逻辑,5s后尝试half-open放过少量流量试着恢复,默认5000hystrix.command.default.circuitBreaker.forceOpen:强制打开熔断器hystrix.command.default.circuitBreaker.forceClosed:强制关闭熔断器
5.指标(metric)相关的属性
hystrix.threadpool.default.metrics.rollingStats.timeInMillisecond:线程池统计指标的时间,默认10000,就是10shystrix.threadpool.default.metrics.rollingStats.numBuckets:将rolling window划分为n个buckets,默认10hystrix.command.default.metrics.rollingStats.timeInMilliseconds:command的统计时间,熔断器是否打开会根据1个rolling window的统计来计算。若rolling window被设为10000毫秒,则rolling window会被分成n个buckets,每个bucket包含success,failure,timeout,rejection的次数的统计信息。默认10000hystrix.command.default.metrics.rollingStats.numBuckets: 设置一个rolling window被划分的数量,若numBuckets=10,rolling window=10000,那么一个bucket的时间即1秒。必须符合rolling window % numberBuckets == 0。默认10hystrix.command.default.metrics.rollingPercentile.enabled: 执行时是否enable指标的计算和跟踪,默认truehystrix.command.default.metrics.rollingPercentile.timeInMilliseconds: 设置rolling percentile window的时间,默认60000hystrix.command.default.metrics.rollingPercentile.numBuckets: 设置rolling percentile window的numberBuckets。逻辑同上。默认6hystrix.command.default.metrics.rollingPercentile.bucketSize如果bucket size=100,window=10s,若这10s里有500次执行,只有最后100次执行会被统计到bucket里去。增加该值会增加内存开销以及排序的开销。默认100hystrix.command.default.metrics.healthSnapshot.intervalInMilliseconds: 记录health 快照(用来统计成功和错误绿)的间隔,默认500ms
6.高级特性
hystrix.command.default.requestCache.enabled: 默truehystrix.command.default.requestLog.enabled: 记录日志到HystrixRequestLog,默认truehystrix.collapser.default.maxRequestsInBatch: 单次批处理的最大请求数,达到该数量触发批处理,默认Integer.MAX_VALUEhystrix.collapser.default.timerDelayInMilliseconds: 触发批处理的延迟,也可以为创建批处理的时间+该值,默认10hystrix.collapser.default.requestCache.enabled: 是否对 HystrixCollapser.execute() 和 HystrixCollapser.queue() 的cache,默认true
Hystrix和Feign整合原理
Hystrix 生成动态代理
1.通过 HystrixTarget 实例的 target 方法,首先判断之前构建的 Feign.builder 是否是 feign.hystrix.HystrixFeign.Builder;
2.通过 targetWithFallback 方法,从服务独立的 Spring 容器中获取出来一个独立的 FallbackFactory,去获取我们定义好的 fallback 对象实例,在创建的时候,会校验这个 fallback 是否ok ,fallback工厂是否返回了一个 fall对象且不能为空;
3.之后通过 builder 的 build 方法,根据服务信息等参数,构建 HystrixInvocationHandler 实例,并且设置 contract 为 HystrixDelegatingContract ,由这个实例去解析 Hystrix 的注解;
4.在然后通过其父类 Feign.Builder 构建 ReflectiveFeign ,这里的逻辑就和 Feign 构建动态代理的逻辑一样了;
执行流程
首先在构建动态代理对象的时候,会初始化一个 HystrixInvocationHandler 对象,这个实例的构造方法里会用一个 toSetters 方法,这个方法负责将方法和对应的 key 信息组装起来
static Map<Method, Setter> toSetters(SetterFactory setterFactory, Target<?> target,
                                       Set<Method> methods) {
    Map<Method, Setter> result = new LinkedHashMap<Method, Setter>();
    for (Method method : methods) {
      method.setAccessible(true);
      result.put(method, setterFactory.create(target, method));
    }
    return result;
  }

public HystrixCommand.Setter create(Target<?> target, Method method) {
      String groupKey = target.name();
      String commandKey = Feign.configKey(target.type(), method);
      return HystrixCommand.Setter
          .withGroupKey(HystrixCommandGroupKey.Factory.asKey(groupKey))
          .andCommandKey(HystrixCommandKey.Factory.asKey(commandKey));
}
其主要的核心关键在于 create 方法,target 对象中是封装好的服务的相关信息,由源码我们可以看出,一个服务名,也就是 @FeignClient 注解中我们设置的服务名,作为一个 groupKey , 而这个接口中的方法名和方法参数作为 commandKey
一个 groupKey 代表一个线程池,也就是说这个服务所包含的接口调用请求,都由这个线程池来负责完成,一个服务中的接口就代表一个 commandKey ,属于服务的 groupKey。然后通过构建好的 setterMethodMap 构建 HystrixCommand 实例,由它负责执行逻辑,它通过 run() 方法, 通过Method 对象绑定的 handler 对象去进行逻辑的执行,同时还有一个 getFallback 方法,逻辑基本和上面一样,从工厂中获取到对应的 fallback 对象,从 handler 工厂中获取到对应的 handler ,由它去执行降级的方法。
之后就是通过 HystrixCommand 实例去执行 execute() 方法,其内部是调用 queue() 方法,通过 toObservable().toBlocking().toFuture() 获取到对应的 Future 对象,这里面简单的来说,就是从服务对应的线程池中获取到了对应的 Future 对象,然后对这个 Future 对象进行了包装,主要是因为原生的Future 对象无法进行 cancel ,最后返回包装对象 f ,通过 f 判断是否执行完毕,执行完毕直接返回 command 执行的结果
public Future<R> queue() {
        // 获取到服务对应的 Future
        final Future<R> delegate = toObservable().toBlocking().toFuture();
        // 对原生 Future 进行包装
        final Future<R> f = new Future<R>() {

            ...
        }
     if (f.isDone()) { // 判断是否执行完毕
            try {
                f.get();
                return f; // 返回
            } catch (Exception e) {
                Throwable t = decomposeException(e);
                if (t instanceof HystrixBadRequestException) {
                    return f;
                } else if (t instanceof HystrixRuntimeException) {
                    HystrixRuntimeException hre = (HystrixRuntimeException) t;
                    switch (hre.getFailureType()) {
                    case COMMAND_EXCEPTION:
                    case TIMEOUT:
                        // we don't throw these types from queue() only from queue().get() as they are execution errors
                        return f;
                    default:
                        // these are errors we throw from queue() as they as rejection type errors
                        throw hre;
                    }
                } else {
                    throw Exceptions.sneakyThrow(t);
                }
            }
        }
        return f;
}
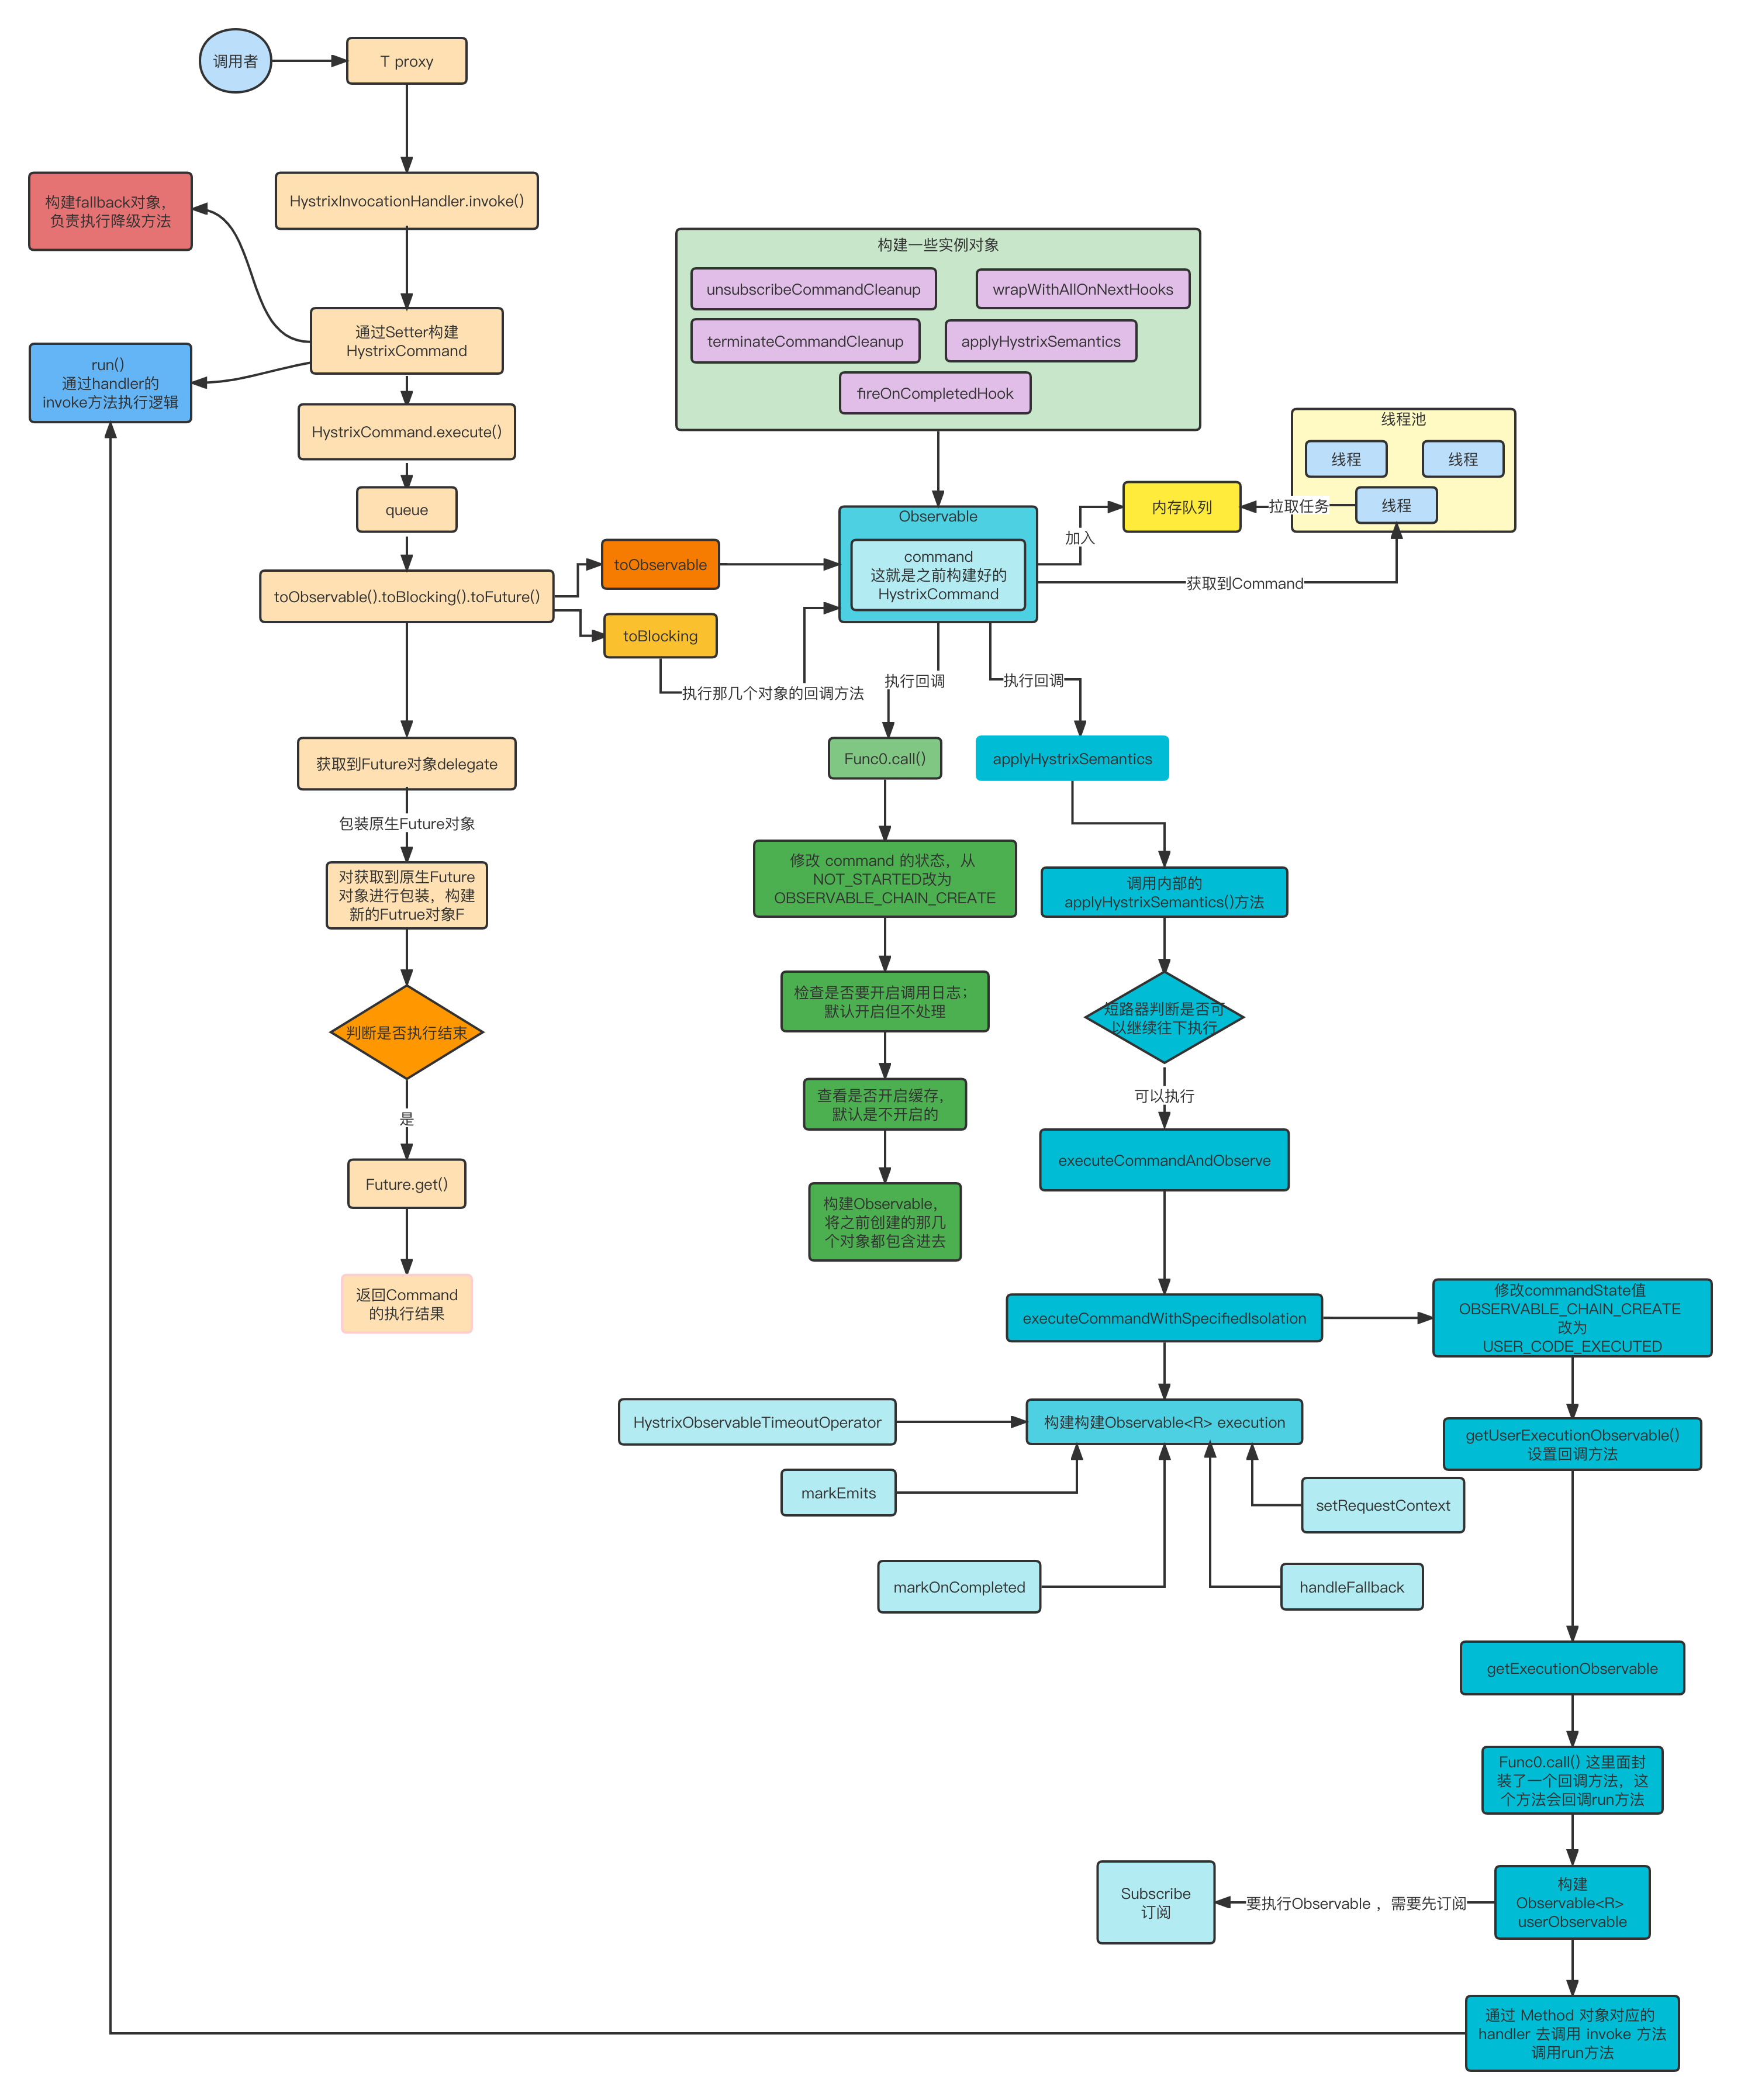
在 toObservable 方法中,会创建出来一个 Observable 对象,在其内部创建了 terminateCommandCleanup、unsubscribeCommandCleanup、applyHystrixSemantics、wrapWithAllOnNextHooks、fireOnCompletedHook 这几个对象,用于回调,最后都封装在了 Observable 对象中,在调用 toBlocking() 方法的时候,会调用那几个对象的call方法,进行回调。
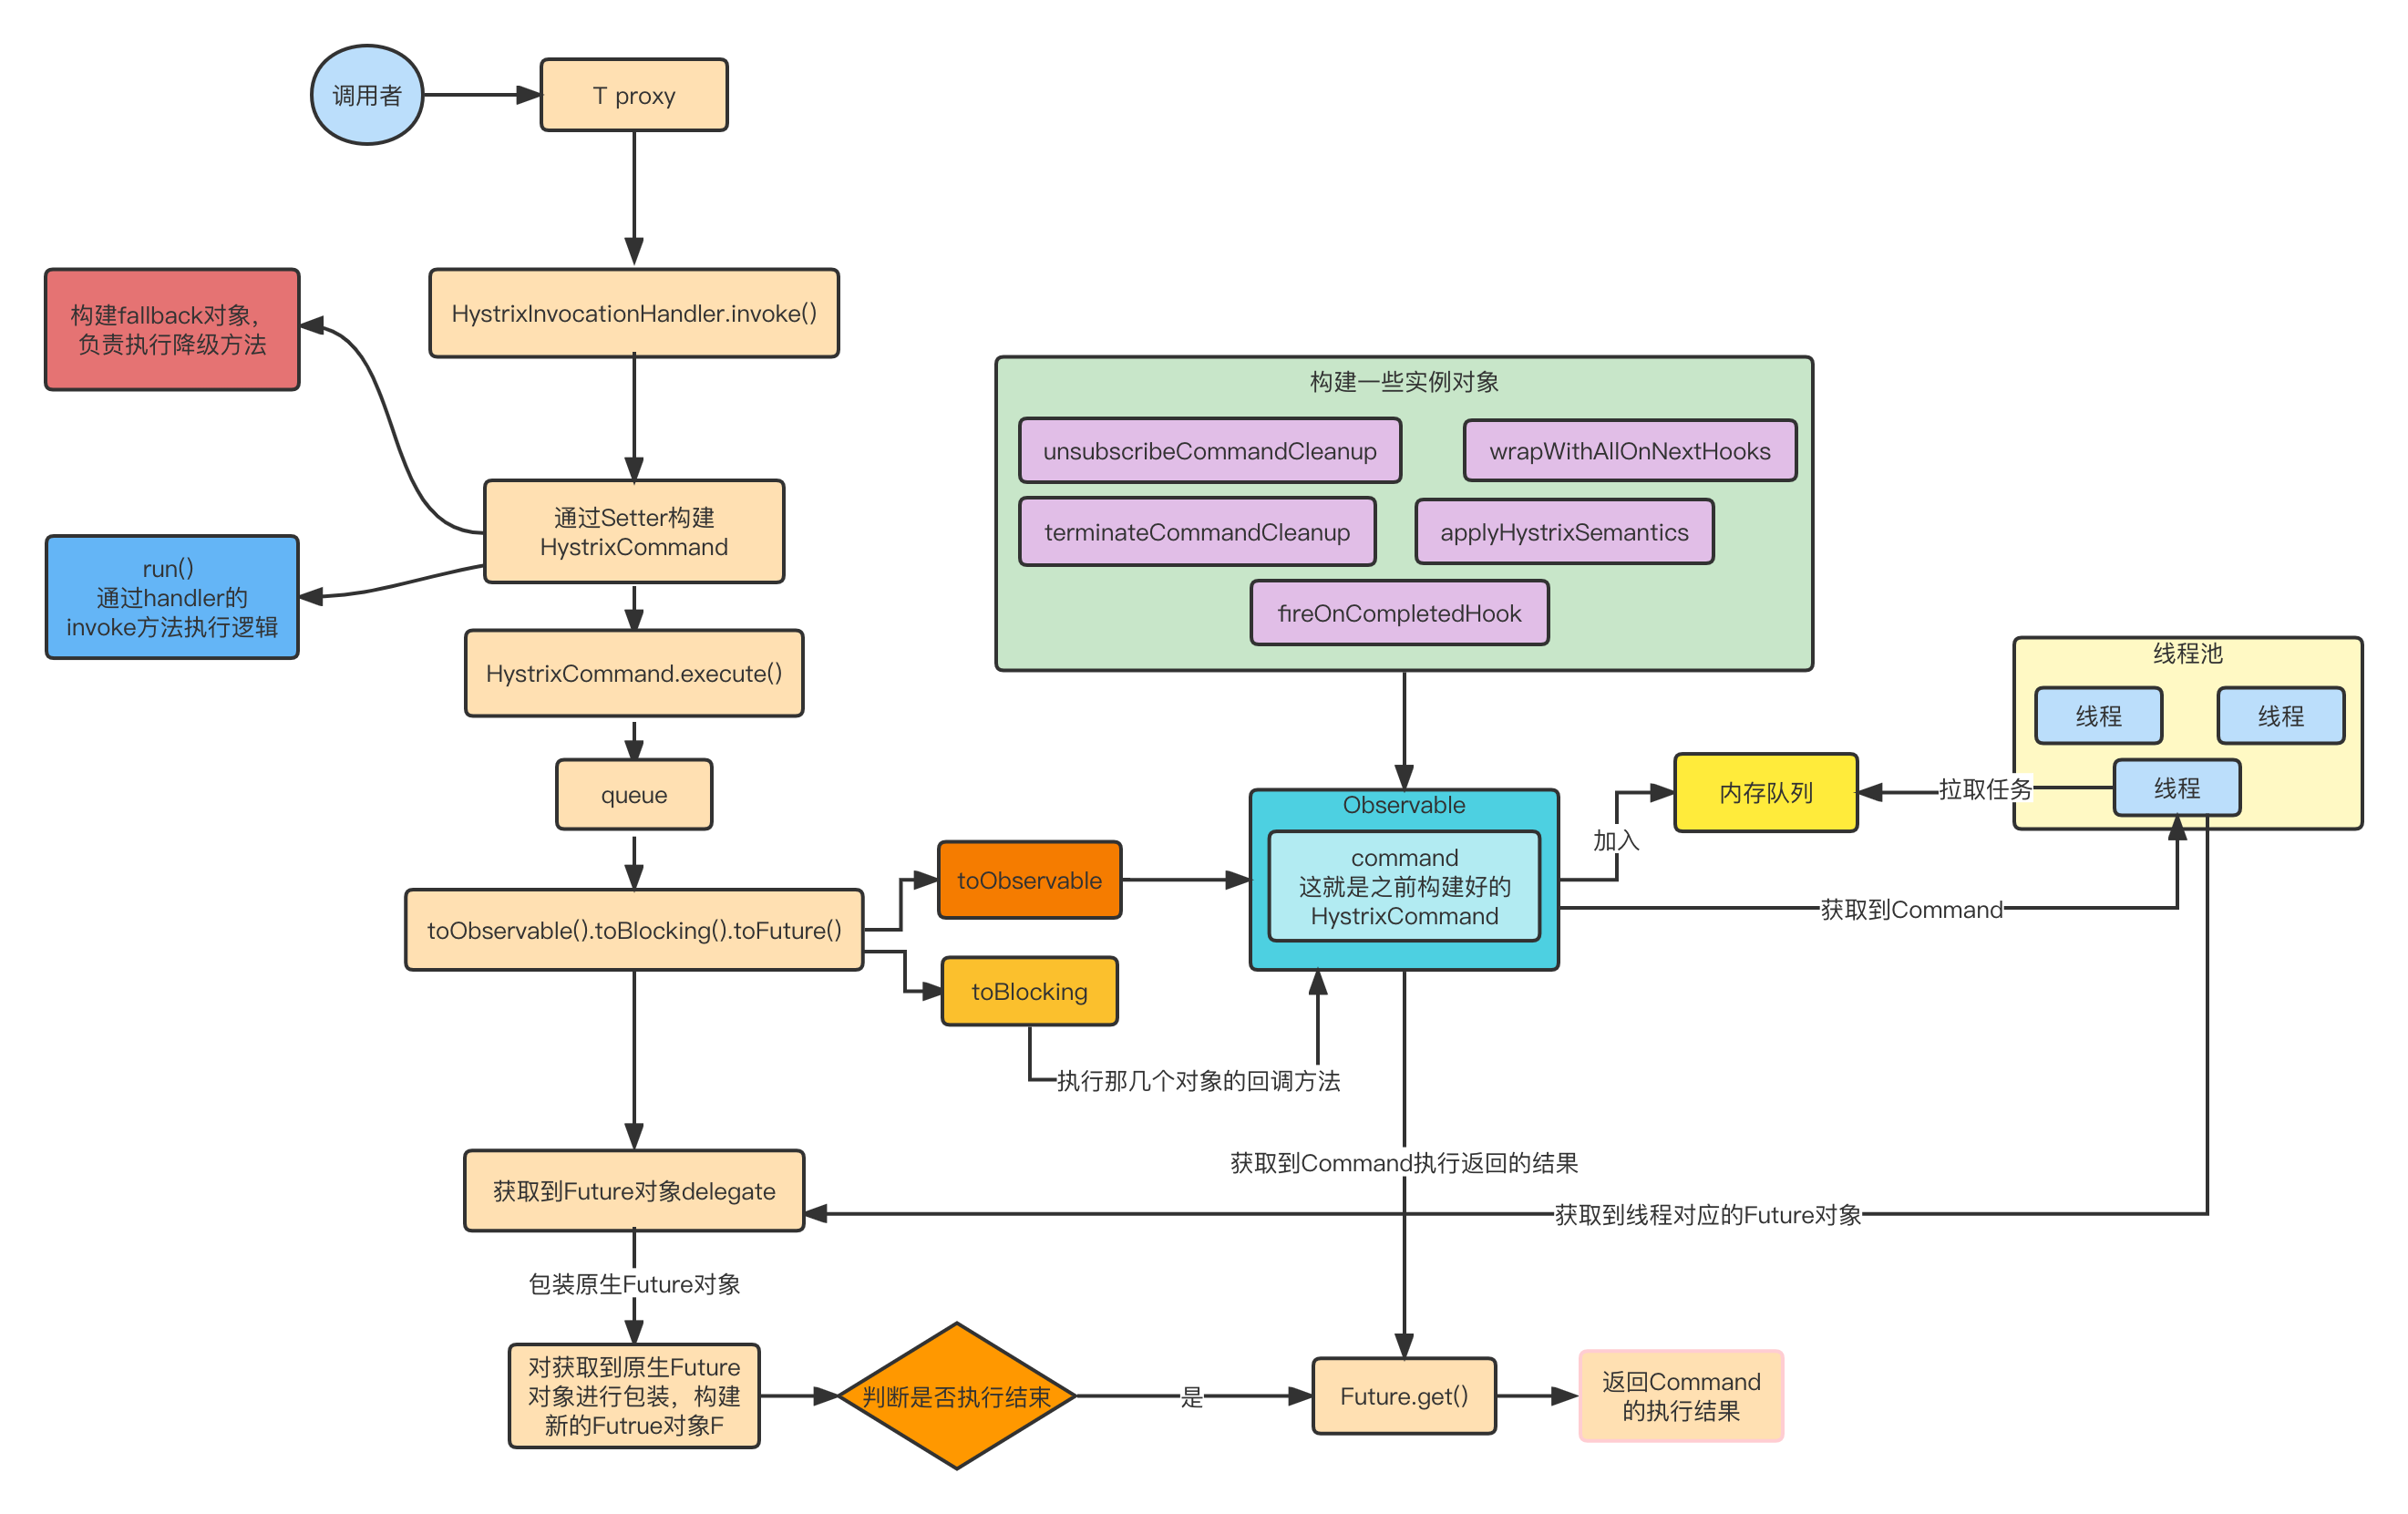
在进行 toBlocking() 方法之后,其实会调用 Func0的call() 方法,这个也就是执行的入口方法,其内部实现也比较简单:首先会先修改 command 的状态,从 NOT_STARTED 改为 OBSERVABLE_CHAIN_CREATE ,然后检查是否要开启调用日志,默认是开启但是不处理,之后会在查看是否开启了缓存,默认是不开启的,最后会构建一个 hystrixObservable 对象,将之前创建的对象交给他,会在创建一个 afterCache,将 hystrixObservable 赋值给他,这个也就是最终返回的 Observable 实例对象。
当调用完它的回调之后,会再调用 applyHystrixSemantics 的回调方法,这里面会调用 applyHystrixSemantics 方法,由短路器判断是否可以继续往下执行,可以执行的话,后续会调用到 executeCommandAndObserve 方法,这里又会构建好多对象:markEmits、markOnCompleted、handleFallback、setRequestContext , 然后判断是否开启了超时检测机制 ,通过 executeCommandWithSpecifiedIsolation 方法中的 Func0.call() 方法,修改一些状态值,Hystrix.startCurrentThreadExecutingCommand(getCommandKey()),通过这个方法将 commandKey 压入栈中,最后经由 getUserExecutionObservable 方法,设置回调方法,在回调方法中负责 run() 方法的执行,返回最终的 userObservable,然后通过回调方法对这个 userObservable 进行订阅,通过 getExecutionObservable 中 Func0.call() 的回调方法,对 run() 方法进行调用,通过 Method 对象对应的 handler 去调用 invoke 方法,进行最终的执行。
线程池相关
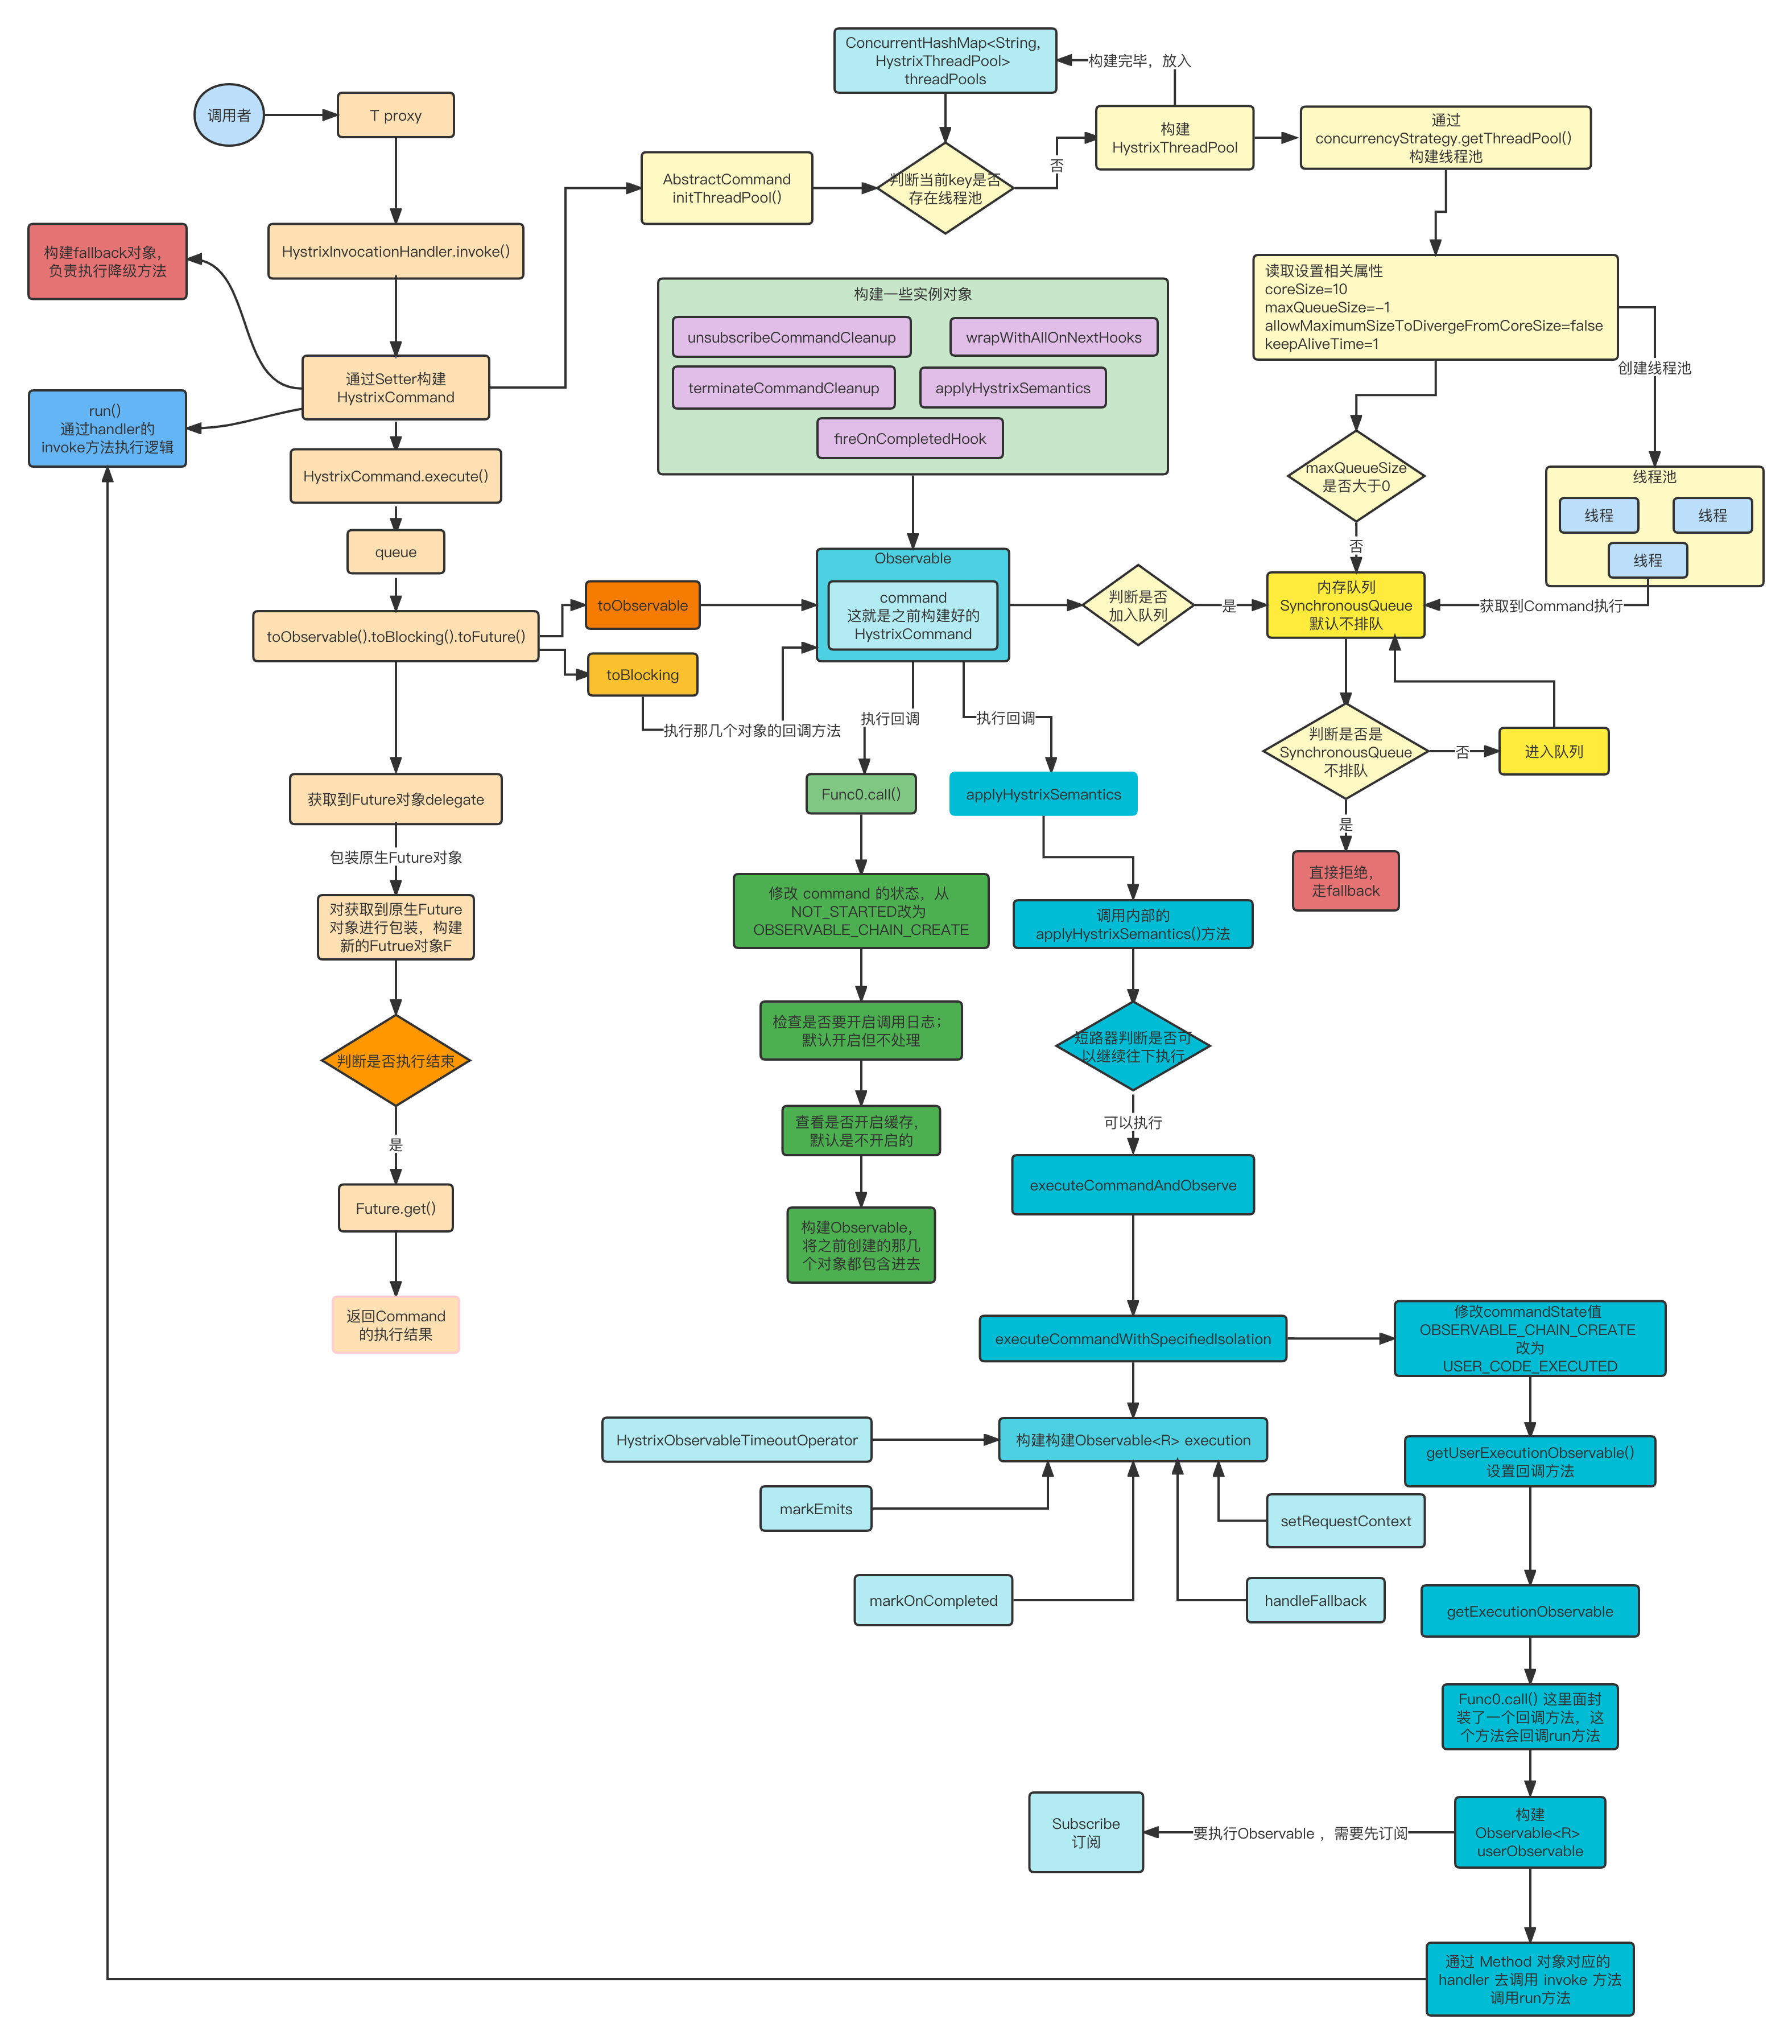
其实相关的线程池的构造逻辑,在 HystrixInvocationHandler 中,在它的 invoke 方法里,在构建 HystrixCommand 实例的时候,它的构造方法又调用了父类 AbstractCommand 的构造方法。
protected AbstractCommand(HystrixCommandGroupKey group, HystrixCommandKey key, HystrixThreadPoolKey threadPoolKey, HystrixCircuitBreaker circuitBreaker, HystrixThreadPool threadPool,
            HystrixCommandProperties.Setter commandPropertiesDefaults, HystrixThreadPoolProperties.Setter threadPoolPropertiesDefaults,
            HystrixCommandMetrics metrics, TryableSemaphore fallbackSemaphore, TryableSemaphore executionSemaphore,
            HystrixPropertiesStrategy propertiesStrategy, HystrixCommandExecutionHook executionHook) {
        //
        this.commandGroup = initGroupKey(group);
        this.commandKey = initCommandKey(key, getClass());
        this.properties = initCommandProperties(this.commandKey, propertiesStrategy, commandPropertiesDefaults);
        this.threadPoolKey = initThreadPoolKey(threadPoolKey, this.commandGroup, this.properties.executionIsolationThreadPoolKeyOverride().get());
        this.metrics = initMetrics(metrics, this.commandGroup, this.threadPoolKey, this.commandKey, this.properties);
        this.circuitBreaker = initCircuitBreaker(this.properties.circuitBreakerEnabled().get(), circuitBreaker, this.commandGroup, this.commandKey, this.properties, this.metrics);
        // 这个方法用于线程池的初始化
        this.threadPool = initThreadPool(threadPool, this.threadPoolKey, threadPoolPropertiesDefaults);

        ... ...
    }
上面 initThreadPool 方法,会调用一个 getInstance方法
private static HystrixThreadPool initThreadPool(HystrixThreadPool fromConstructor, HystrixThreadPoolKey threadPoolKey, HystrixThreadPoolProperties.Setter threadPoolPropertiesDefaults) {
        if (fromConstructor == null) {
            // get the default implementation of HystrixThreadPool
            return HystrixThreadPool.Factory.getInstance(threadPoolKey, threadPoolPropertiesDefaults);
        } else {
            return fromConstructor;
        }
}
这里面就是如果这个 threadPoolKey 没有对应的线程池的话,会 new 一个 HystrixThreadPoolDefault 出来,从这个类中完成线程池的初始化工作,threadPools 这个属性就是个 concurrentHashMap。
static HystrixThreadPool getInstance(HystrixThreadPoolKey threadPoolKey, HystrixThreadPoolProperties.Setter propertiesBuilder) {
    // get the key to use instead of using the object itself so that if people forget to implement equals/hashcode things will still work
    String key = threadPoolKey.name();

    // this should find it for all but the first time
    HystrixThreadPool previouslyCached = threadPools.get(key);
    if (previouslyCached != null) {
        return previouslyCached;
    }

    // if we get here this is the first time so we need to initialize
    synchronized (HystrixThreadPool.class) {
        if (!threadPools.containsKey(key)) {
            // 这里面就是核心喽
            threadPools.put(key, new HystrixThreadPoolDefault(threadPoolKey, propertiesBuilder));
        }
    }
    return threadPools.get(key);
}
接着往下走,看看怎么构建 HystrixThreadPoolDefault,首先还是获取到相关的属性信息,通过 concurrencyStrategy.getThreadPool() 方法,执行线程池的创建
public HystrixThreadPoolDefault(HystrixThreadPoolKey threadPoolKey, HystrixThreadPoolProperties.Setter propertiesDefaults) {
    this.properties = HystrixPropertiesFactory.getThreadPoolProperties(threadPoolKey, propertiesDefaults);
    HystrixConcurrencyStrategy concurrencyStrategy = HystrixPlugins.getInstance().getConcurrencyStrategy();
    this.queueSize = properties.maxQueueSize().get();

    this.metrics = HystrixThreadPoolMetrics.getInstance(threadPoolKey,
            concurrencyStrategy.getThreadPool(threadPoolKey, properties),
            properties);
    this.threadPool = this.metrics.getThreadPool();
    this.queue = this.threadPool.getQueue();

    /* strategy: HystrixMetricsPublisherThreadPool */
    HystrixMetricsPublisherFactory.createOrRetrievePublisherForThreadPool(threadPoolKey, this.metrics, this.properties);
}
根据配置的相关参数,构建队列和线程池,默认值:coreSize = 10 , maxQueueSize = -1 这个参数间接导致了 BlockingQueue 类型为SynchronousQueue,也就是默认不排队
public ThreadPoolExecutor getThreadPool(final HystrixThreadPoolKey threadPoolKey, HystrixThreadPoolProperties threadPoolProperties) {
    final ThreadFactory threadFactory = getThreadFactory(threadPoolKey);

    final boolean allowMaximumSizeToDivergeFromCoreSize = threadPoolProperties.getAllowMaximumSizeToDivergeFromCoreSize().get();
    final int dynamicCoreSize = threadPoolProperties.coreSize().get();
    final int keepAliveTime = threadPoolProperties.keepAliveTimeMinutes().get();
    final int maxQueueSize = threadPoolProperties.maxQueueSize().get();
    final BlockingQueue<Runnable> workQueue = getBlockingQueue(maxQueueSize);

    if (allowMaximumSizeToDivergeFromCoreSize) {
        final int dynamicMaximumSize = threadPoolProperties.maximumSize().get();
        if (dynamicCoreSize > dynamicMaximumSize) {
            logger.error("Hystrix ThreadPool configuration at startup for : " + threadPoolKey.name() + " is trying to set coreSize = " +
                    dynamicCoreSize + " and maximumSize = " + dynamicMaximumSize + ".  Maximum size will be set to " +
                    dynamicCoreSize + ", the coreSize value, since it must be equal to or greater than the coreSize value");
            return new ThreadPoolExecutor(dynamicCoreSize, dynamicCoreSize, keepAliveTime, TimeUnit.MINUTES, workQueue, threadFactory);
        } else {
            return new ThreadPoolExecutor(dynamicCoreSize, dynamicMaximumSize, keepAliveTime, TimeUnit.MINUTES, workQueue, threadFactory);
        }
    } else {
        return new ThreadPoolExecutor(dynamicCoreSize, dynamicCoreSize, keepAliveTime, TimeUnit.MINUTES, workQueue, threadFactory);
    }
}| 参数名称 | 说明 |
|---|---|
| allowMaximumSizeToDivergeFromCoreSize | true/false 代表是否允许自动扩容 |
| keepAliveTime | 上面那个参数开启后,会自动扩容创建新的线程,而新的线程闲置超过这个时间之后,就会被回收 |
| dynamicMaximumSize | 上面那个参数开启后,最多允许扩容到多少个线程 |
| maxQueueSize | 排队队列可以容纳多少个请求,默认值是 -1 |
| BlockingQueue | 队列,因为上面那个参数默认是 -1 ,那么这个队列默认是 SynchronousQueue ,也就是不排队;上面那个参数值 > 0 的话,就是 LinkedBlockingQueue(maxQueueSize) |
| dynamicCoreSize | 默认是 10,线程池中有十个线程 |
 |
其实在调用 executeCommandWithSpecifiedIsolation() 方法,进行 execution Observable 的时候,执行了一个 subscribeOn() 方法,这段代码的核心不再 call 里,而是在 getScheduler() 里
subscribeOn(threadPool.getScheduler(new Func0<Boolean>() {
    @Override
    public Boolean call() {
        return properties.executionIsolationThreadInterruptOnTimeout().get() && _cmd.isCommandTimedOut.get() == TimedOutStatus.TIMED_OUT;
    }
}
主要就是new了一个 HystrixContextScheduler,这个也就简单的赋值了一些属性,然后 new 了一个 ThreadPoolScheduler 实例
@Override
public Scheduler getScheduler(Func0<Boolean> shouldInterruptThread) {
    touchConfig(); // 设置些线程池相关的参数值
    return new HystrixContextScheduler(HystrixPlugins.getInstance().getConcurrencyStrategy(), this, shouldInterruptThread);
}

public HystrixContextScheduler(HystrixConcurrencyStrategy concurrencyStrategy, HystrixThreadPool threadPool, Func0<Boolean> shouldInterruptThread) {
        this.concurrencyStrategy = concurrencyStrategy;
        this.threadPool = threadPool;
        this.actualScheduler = new ThreadPoolScheduler(threadPool, shouldInterruptThread);
}
HystrixContextScheduler 会调用里面的 createWorker() ,创建出来 HystrixContextSchedulerWorker,通过它的 scheduler() ,这个方法会判断线程池的队列是否已满
@Override
public Subscription schedule(Action0 action) {
    if (threadPool != null) {
        // 判断线程池队列是否满了
        if (!threadPool.isQueueSpaceAvailable()) {
            throw new RejectedExecutionException("Rejected command because thread-pool queueSize is at rejection threshold.");
        }
    }
    return worker.schedule(new HystrixContexSchedulerAction(concurrencyStrategy, action));
}
主要就是通过 !threadPool.isQueueSpaceAvailable() 进行判断,逻辑也比较简单,若 maxQueueSize < 0 直接返回已满,如果不是,继续判断 当前队列的数量是否 < queueSizeRejectionThreshold 的属性值
public boolean isQueueSpaceAvailable() {
    if (queueSize <= 0) {
        // we don't have a queue so we won't look for space but instead
        // let the thread-pool reject or not
        return true;
    } else {
        return threadPool.getQueue().size() < properties.queueSizeRejectionThreshold().get();
    }
}
判断完之后,满了就直接报错,没满就开始通过 ThreadPoolWorker 的 schedule 方法,将任务提交,在调用这个方法之前是创建了一个 HystrixContexSchedulerAction 对象,也就是下面的 ScheduledAction 。
@Override
public Subscription schedule(final Action0 action) {
    if (subscription.isUnsubscribed()) {
        // don't schedule, we are unsubscribed
        return Subscriptions.unsubscribed();
    }

    // This is internal RxJava API but it is too useful.
    ScheduledAction sa = new ScheduledAction(action);

    subscription.add(sa);
    sa.addParent(subscription);

    ThreadPoolExecutor executor = (ThreadPoolExecutor) threadPool.getExecutor();
    FutureTask<?> f = (FutureTask<?>) executor.submit(sa);
    sa.add(new FutureCompleterWithConfigurableInterrupt(f, shouldInterruptThread, executor));

    return sa;
}
现在任务提交到线程池了,提交线程池时也设置好了 Future,这样就是 toObservable().toBlocking().toFuture() 就可以拿到 Future 对象了。
接下来就该执行了,继续往下运行会发现,最后走的还是 executeCommandWithSpecifiedIsolation() 里 Func0.call() 的方法,userObservable 里的 call() 方法,执行了 command 的 run 方法,执行的逻辑在前面写过了。
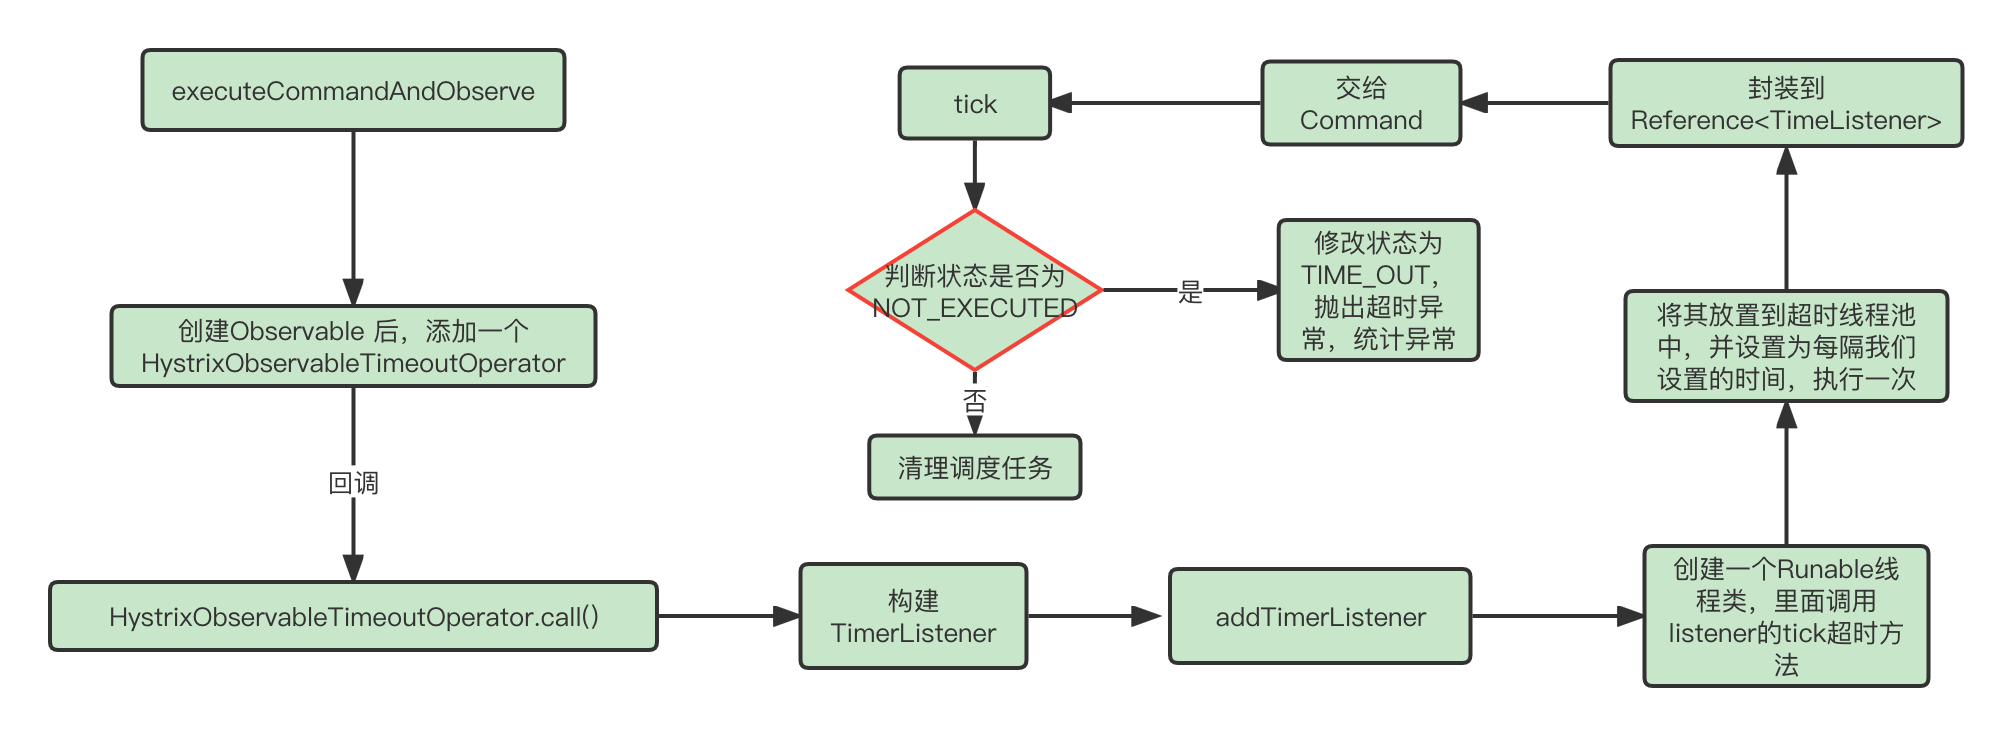
超时
超时的主要逻辑:在创建 Observable 之后,给这个 Observable 加了一个HystrixObservableTimeoutOperator 实例,它里面的 call() 方法是关键,主要是构建了一个 TimeListener , 由 tick() 方法负责处理超时的逻辑,首先会去判断状态,状态是 NOT_EXECUTED 的话,将其改成 TIME_OUT 状态,抛出相关异常。
TimerListener listener = new TimerListener() {

    @Override
    public void tick() {
        // if we can go from NOT_EXECUTED to TIMED_OUT then we do the timeout codepath
        // otherwise it means we lost a race and the run() execution completed or did not start
        if (originalCommand.isCommandTimedOut.compareAndSet(TimedOutStatus.NOT_EXECUTED, TimedOutStatus.TIMED_OUT)) {
            // report timeout failure
            originalCommand.eventNotifier.markEvent(HystrixEventType.TIMEOUT, originalCommand.commandKey);

            // shut down the original request
            s.unsubscribe();

            final HystrixContextRunnable timeoutRunnable = new HystrixContextRunnable(originalCommand.concurrencyStrategy, hystrixRequestContext, new Runnable() {

                @Override
                public void run() {
                    child.onError(new HystrixTimeoutException());
                }
            });

            timeoutRunnable.run();
            //if it did not start, then we need to mark a command start for concurrency metrics, and then issue the timeout
        }
    }

    @Override
    public int getIntervalTimeInMilliseconds() {
        return originalCommand.properties.executionTimeoutInMilliseconds().get();
    }
};
然后将构建好的 TimeListener 放入到线程池中,对于超时的处理,有自己的一个线程池,默认 coreSize = 4 ,里面会有 Runnable 线程类去调用上面的 tick() 方法。并且是每隔我们设置的超时时间去执行一次,最后在任务执行完毕,没有超时的话,会将调度任务清理掉。
public Reference<TimerListener> addTimerListener(final TimerListener listener) {
    startThreadIfNeeded();
    // add the listener

    Runnable r = new Runnable() {

        @Override
        public void run() {
            try {
                listener.tick();
            } catch (Exception e) {
                logger.error("Failed while ticking TimerListener", e);
            }
        }
    };

    ScheduledFuture<?> f = executor.get().getThreadPool().scheduleAtFixedRate(r, listener.getIntervalTimeInMilliseconds(), listener.getIntervalTimeInMilliseconds(), TimeUnit.MILLISECONDS);
    return new TimerReference(listener, f);
}
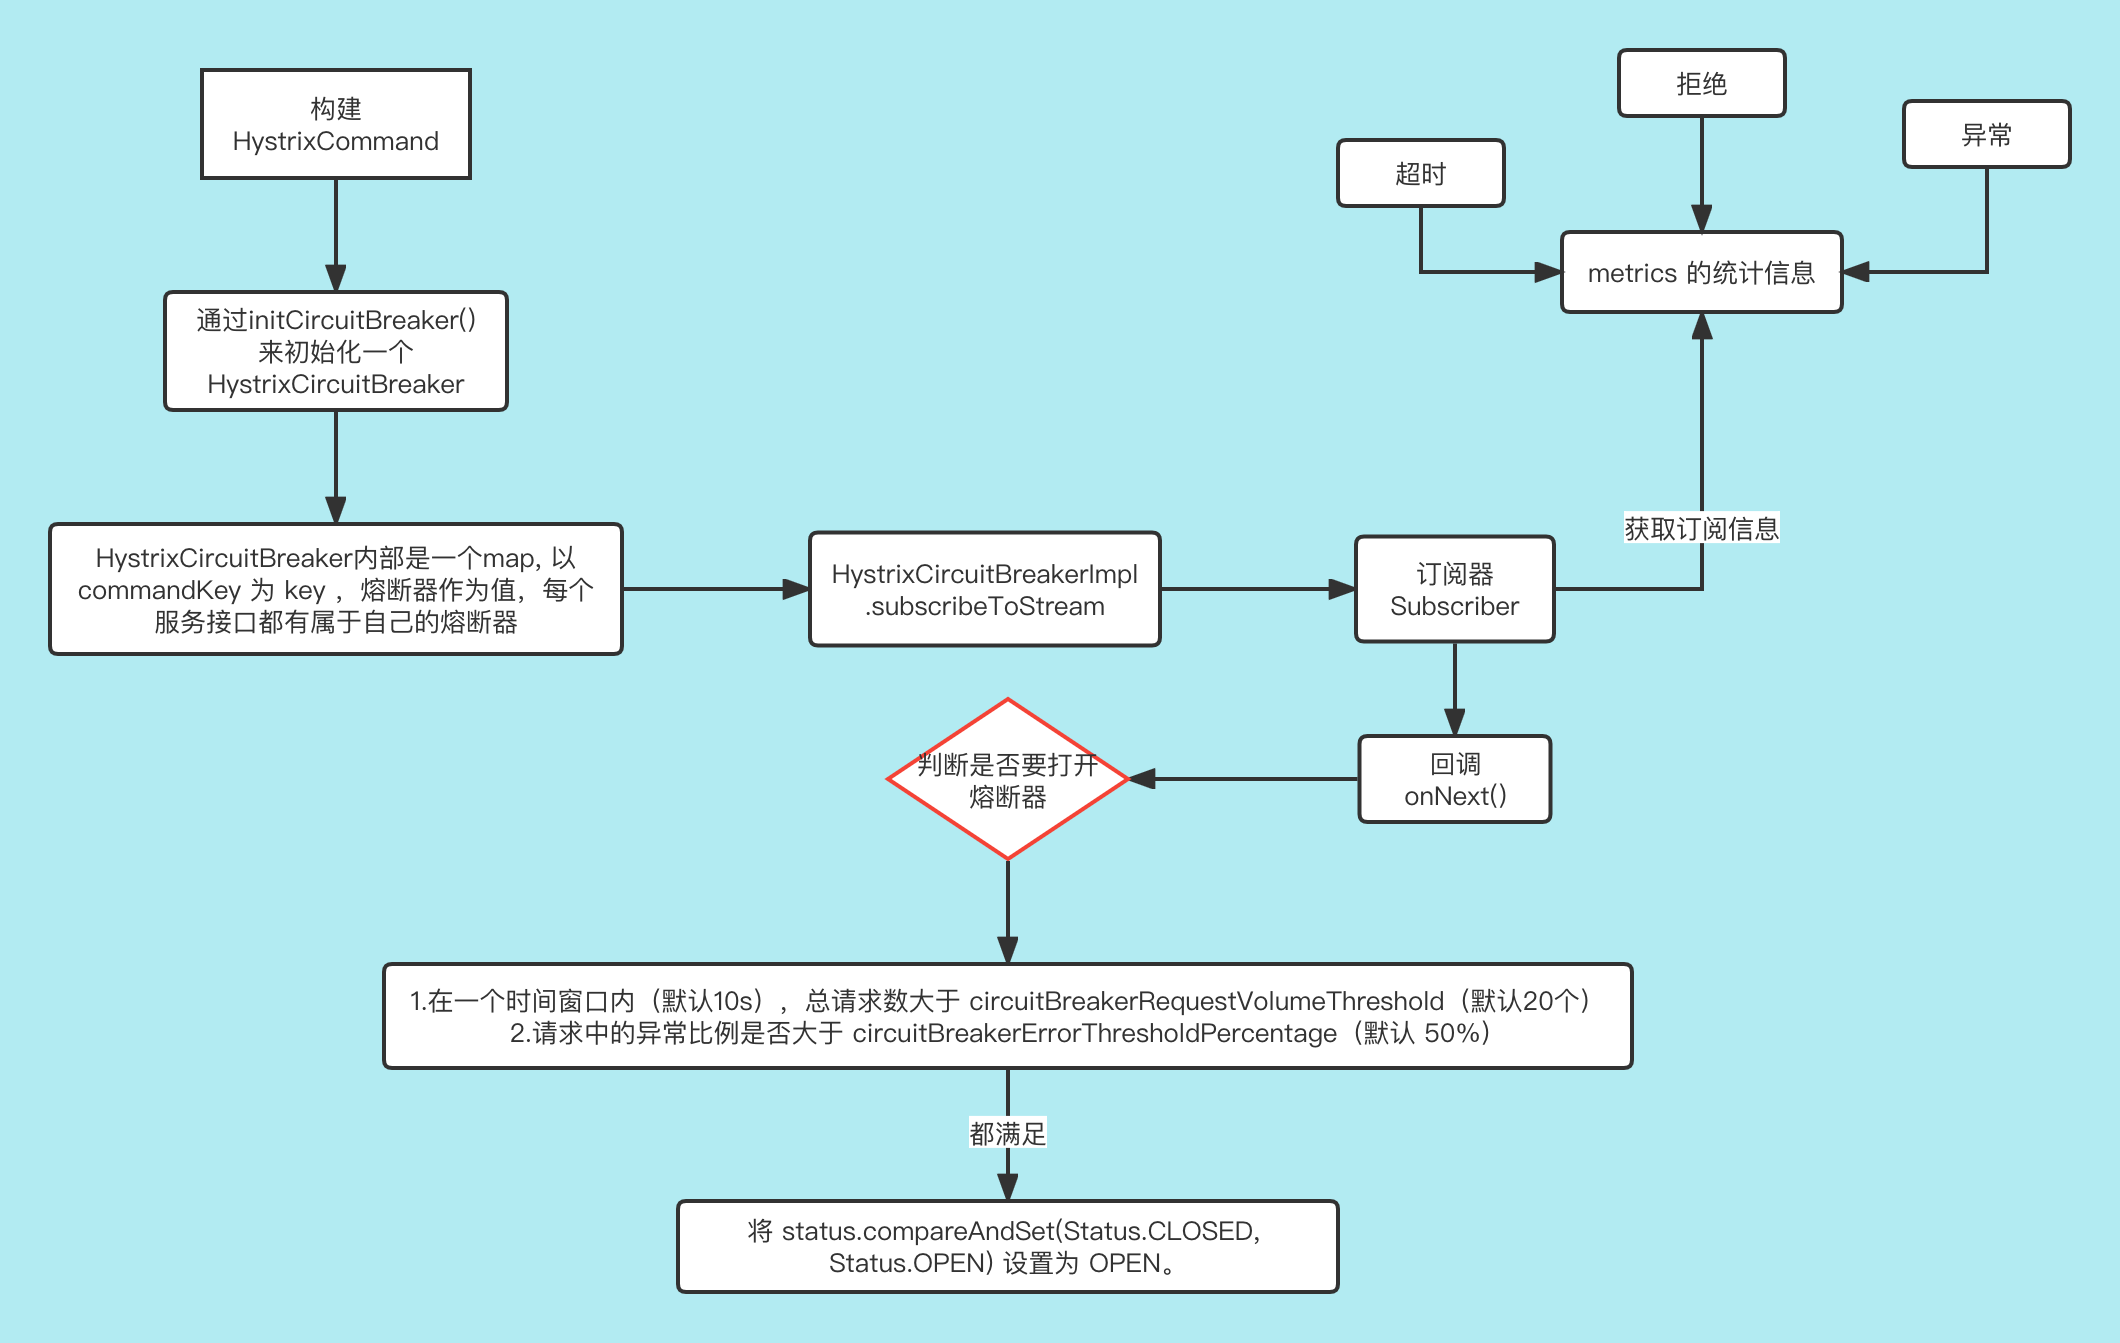
熔断
熔断的话,是在创建 HystrixCommand 的时候会去初始化一个 HystrixCircuitBreaker, 它内部也就是一个map, 以 commandKey 为 key ,熔断器作为值,保证每个服务中的每个接口都有属于自己的熔断器
会通过 HystrixCircuitBreakerImpl 去构建熔断器,Subscription s = subscribeToStream() 是判断逻辑的核心。
protected HystrixCircuitBreakerImpl(HystrixCommandKey key, HystrixCommandGroupKey commandGroup, final HystrixCommandProperties properties, HystrixCommandMetrics metrics) {
    this.properties = properties;
    this.metrics = metrics;

    //On a timer, this will set the circuit between OPEN/CLOSED as command executions occur
    Subscription s = subscribeToStream();
    activeSubscription.set(s);
}
这里主要就是通过订阅器来订阅 metrics 的统计信息,通过回调 onNext() 方法,来判断是否要开启熔断器。
首先要保证在一个时间窗口内(默认10s),总请求数大于 circuitBreakerRequestVolumeThreshold (默认20个),然后再去判断,请求中的异常比例是否大于 circuitBreakerErrorThresholdPercentage(默认 50%),如果都满足的话,就将 status.compareAndSet(Status.CLOSED, Status.OPEN) 设置为 OPEN。
private Subscription subscribeToStream() {
    /*
     * This stream will recalculate the OPEN/CLOSED status on every onNext from the health stream
     */
    return metrics.getHealthCountsStream()
            .observe()
            .subscribe(new Subscriber<HealthCounts>() {
          ... ...

                @Override
                public void onNext(HealthCounts hc) {
                    // check if we are past the statisticalWindowVolumeThreshold
                    if (hc.getTotalRequests() < properties.circuitBreakerRequestVolumeThreshold().get()) {
                        // we are not past the minimum volume threshold for the stat window,
                        // so no change to circuit status.
                        // if it was CLOSED, it stays CLOSED
                        // if it was half-open, we need to wait for a successful command execution
                        // if it was open, we need to wait for sleep window to elapse
                    } else {
                        if (hc.getErrorPercentage() < properties.circuitBreakerErrorThresholdPercentage().get()) {
                            //we are not past the minimum error threshold for the stat window,
                            // so no change to circuit status.
                            // if it was CLOSED, it stays CLOSED
                            // if it was half-open, we need to wait for a successful command execution
                            // if it was open, we need to wait for sleep window to elapse
                        } else {
                            // our failure rate is too high, we need to set the state to OPEN
                            if (status.compareAndSet(Status.CLOSED, Status.OPEN)) {
                                circuitOpened.set(System.currentTimeMillis());
                            }
                        }
                    }
                }
            });
}
当熔断器打开之后,通过 observable 的回调 applyHystrixSemantics 方法中,就会去判断要不要走熔断。
private Observable<R> applyHystrixSemantics(final AbstractCommand<R> _cmd) {
        // mark that we're starting execution on the ExecutionHook
        // if this hook throws an exception, then a fast-fail occurs with no fallback.  No state is left inconsistent
        executionHook.onStart(_cmd);

        /* determine if we're allowed to execute */
        if (circuitBreaker.attemptExecution()) {
            //todo 正常流程
        } else {
            // todo 走降级
        }
}
判断逻辑:首先是两个是否强制打开和关闭,这个不用管,下面那个的话,默认的话是 -1 ,但是熔断器如果打开的时候,会将其设置为当前时间,后面还有一个 isAfterSleepWindow() 方法,主要就是判断,熔断器开启的时候,是否大于了 circuitBreakerSleepWindowInMilliseconds (默认5s),便于后续设置为 HAFL_OPEN,去进行重试,恢复关闭断路器。
@Override
public boolean attemptExecution() {
    // 熔断器是否强制开启
    if (properties.circuitBreakerForceOpen().get()) {
        return false;
    }
    // 熔断器是否强制关闭
    if (properties.circuitBreakerForceClosed().get()) {
        return true;
    }

    // 熔断器开启时间,默认-1;熔断器触发开启时会将其设置为当前时间
    if (circuitOpened.get() == -1) {
        return true;
    } else {
        // 判断距离上一次开启熔断的时间是否大于设置的间隔时间,默认5s;
        if (isAfterSleepWindow()) {
            // 这里尝试将其状态设置为HALF_OPEN,这样会让后面的请求尝试去请求一次看看是否恢复正常了。
        // 如果仍然不行,则将其重置为OPEN,同时更新熔断器开启时间为当前时间戳
            if (status.compareAndSet(Status.OPEN, Status.HALF_OPEN)) {
                //only the first request after sleep window should execute
                return true;
            } else {
                return false;
            }
        } else {
            return false;
        }
    }
}

private boolean isAfterSleepWindow() {
    final long circuitOpenTime = circuitOpened.get();
    final long currentTime = System.currentTimeMillis();
    final long sleepWindowTime = properties.circuitBreakerSleepWindowInMilliseconds().get();
    return currentTime > circuitOpenTime + sleepWindowTime;
}
就上面那个判断来说,如果当前时间超过了 熔断器打开的时间+我们设置的间隔时间,就会将熔断器设置为 HASL_OPEN 状态,这时是不会走熔断的,会尝试走一次正常流程,如果说这次正常流程还是失败的话,会通过回调 handleFallback 的 call() 执行 circuitBreaker.markNonSuccess(); 逻辑很简单,就是在将熔断器设置为 OPEN 状态,更新当前时间戳。
@Override
public void markNonSuccess() {
    if (status.compareAndSet(Status.HALF_OPEN, Status.OPEN)) {
        //This thread wins the race to re-open the circuit - it resets the start time for the sleep window
        circuitOpened.set(System.currentTimeMillis());
    }
}
如果这次执行成功的话,会通过回调markEmits 的 circuitBreaker.markSuccess(); 将熔断器关闭
@Override
public void markSuccess() {
    if (status.compareAndSet(Status.HALF_OPEN, Status.CLOSED)) {
        //This thread wins the race to close the circuit - it resets the stream to start it over from 0
        metrics.resetStream();
        Subscription previousSubscription = activeSubscription.get();
        if (previousSubscription != null) {
            previousSubscription.unsubscribe();
        }
        Subscription newSubscription = subscribeToStream();
        activeSubscription.set(newSubscription);
        circuitOpened.set(-1L);
    }
}